bread ala jamie oliver style
Oh gosh, oh gosh, oh gosh!
From the moment I read Jamie Oliver's recipe on banana and honey bread, and looked at that scrumptious, tantalising picture of his creation, I've been drooling non-stop and itching to try out the recipe. Despite having to work in the morning, I was still gung-ho in getting my hands and elbows dusted with flour.
It starts off with his basic bread recipe, and with a bit of variation it becomes the yummy-licious, chewy banana bread. I've combined both into a single post, and edited a bit of commentary so it wouldn't appear too long. Do visit Jamie Oliver's site for the originals.
INGREDIENTS:
30g/1oz fresh yeast or 3 x 7g sachets dried yeast
625ml/just over 1 pint tepid water
1kg/just over 2lb strong bread flour
30g/1oz salt
6 bananas
8 tablespoons good, runny honey
Some extra flour for dusting
optional: 1 handful of almonds, cracked or chopped
DIRECTIONS:
Stage 1
Peel your bananas then puree them in a liquidizer or food processor. Pour it into a measuring jug, then top up with water until you have 625ml or just over 1 pint. Dissolve the yeast in half this banana liquid to flavour your bread and make it nice and chewy.
Stage 2
On a clean surface or in a large bowl, make a pile of the flour and salt. Make a well in the centre and pour in all the dissolved yeast mixture. With 4 fingers of one hand, make circular movements from the centre moving outwards, slowly bringing in more and more of the flour until all the yeast mixture is soaked up. Then pour the other half of the banana liquid into the centre and gradually incorporate all the flour to make a moist dough. (Certain flours may need a little more water, so don't be afraid to adjust the quantities.) Also add half the honey with the nuts to the dough.
Stage 3
Knead the dough for about 5 minutes. This develops the gluten and the structure of the dough. If any of the dough sticks to your hands, just rub them together with a little extra flour.
Stage 4
Flour both your hands well, and lightly flour the top of the dough. Make it into a roundish shape and place on a baking tray. Deeply score the dough with a knife - allowing it to relax and prove with ease. Leave it to prove until it's doubled in size. Ideally you want a warm, moist, draught-free place for the quickest prove. This proving process improves the flavour and texture of the dough and should take around 40 minutes, depending on the conditions.
Stage 5
When the dough has doubled in size you need to knock the air out of it by bashing it around for a minute. Divide the dough into 10 balls. Then pack these next to each other in a flour-dusted baking tin and leave it to prove for a second time until it doubles in size again.
Stage 6
Gently place it in the preheated oven, don't slam the door. Before putting in the oven drizzle generously with the rest of the honey so that the top of the bread will caramelize, going nice and golden. Bake in your preheated oven at 190°C/ 375°F/gas 5 for 20 minutes. You can tell if your bread is cooked by tapping its bottom (if it's in a tin you'll have to take it out). If it sounds hollow it's cooked, if it doesn't then pop it back in for a little longer. Place it on a rack to cool.
RESULTS:

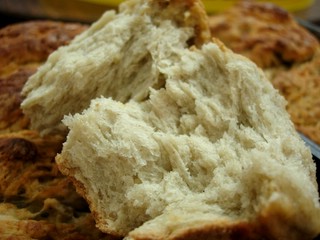
My bread didn't turn out that delicious-looking compared to his picture, but it tasted pretty good! Since I don't know how the original would really taste like... I take it that it's pretty much as yummy as it is now, except maybe the texture might've been a little less compact, a little more airy, perhaps?
I noticed that while kneading, the dough's pretty dry. Do add water until it becomes nice and stretchy. I think I added too little this time around. Either way, my "guinea pigs" (mum and aunt) gave one and a half thumbs up!
Heavenly with butter!
Technorati: food, recipes
From the moment I read Jamie Oliver's recipe on banana and honey bread, and looked at that scrumptious, tantalising picture of his creation, I've been drooling non-stop and itching to try out the recipe. Despite having to work in the morning, I was still gung-ho in getting my hands and elbows dusted with flour.
It starts off with his basic bread recipe, and with a bit of variation it becomes the yummy-licious, chewy banana bread. I've combined both into a single post, and edited a bit of commentary so it wouldn't appear too long. Do visit Jamie Oliver's site for the originals.
INGREDIENTS:
30g/1oz fresh yeast or 3 x 7g sachets dried yeast
625ml/just over 1 pint tepid water
1kg/just over 2lb strong bread flour
30g/1oz salt
6 bananas
8 tablespoons good, runny honey
Some extra flour for dusting
optional: 1 handful of almonds, cracked or chopped
DIRECTIONS:
Stage 1
Peel your bananas then puree them in a liquidizer or food processor. Pour it into a measuring jug, then top up with water until you have 625ml or just over 1 pint. Dissolve the yeast in half this banana liquid to flavour your bread and make it nice and chewy.
Stage 2
On a clean surface or in a large bowl, make a pile of the flour and salt. Make a well in the centre and pour in all the dissolved yeast mixture. With 4 fingers of one hand, make circular movements from the centre moving outwards, slowly bringing in more and more of the flour until all the yeast mixture is soaked up. Then pour the other half of the banana liquid into the centre and gradually incorporate all the flour to make a moist dough. (Certain flours may need a little more water, so don't be afraid to adjust the quantities.) Also add half the honey with the nuts to the dough.
Stage 3
Knead the dough for about 5 minutes. This develops the gluten and the structure of the dough. If any of the dough sticks to your hands, just rub them together with a little extra flour.
Stage 4
Flour both your hands well, and lightly flour the top of the dough. Make it into a roundish shape and place on a baking tray. Deeply score the dough with a knife - allowing it to relax and prove with ease. Leave it to prove until it's doubled in size. Ideally you want a warm, moist, draught-free place for the quickest prove. This proving process improves the flavour and texture of the dough and should take around 40 minutes, depending on the conditions.
Stage 5
When the dough has doubled in size you need to knock the air out of it by bashing it around for a minute. Divide the dough into 10 balls. Then pack these next to each other in a flour-dusted baking tin and leave it to prove for a second time until it doubles in size again.
Stage 6
Gently place it in the preheated oven, don't slam the door. Before putting in the oven drizzle generously with the rest of the honey so that the top of the bread will caramelize, going nice and golden. Bake in your preheated oven at 190°C/ 375°F/gas 5 for 20 minutes. You can tell if your bread is cooked by tapping its bottom (if it's in a tin you'll have to take it out). If it sounds hollow it's cooked, if it doesn't then pop it back in for a little longer. Place it on a rack to cool.
RESULTS:
My bread didn't turn out that delicious-looking compared to his picture, but it tasted pretty good! Since I don't know how the original would really taste like... I take it that it's pretty much as yummy as it is now, except maybe the texture might've been a little less compact, a little more airy, perhaps?
I noticed that while kneading, the dough's pretty dry. Do add water until it becomes nice and stretchy. I think I added too little this time around. Either way, my "guinea pigs" (mum and aunt) gave one and a half thumbs up!
Heavenly with butter!
Technorati: food, recipes
posted by may at 10:46 pm
![]()

<< Home